自定义模式
Kilo Code 允许您创建自定义模式,以根据特定任务或工作流调整 Kilo 的行为。自定义模式可以是全局(适用于所有项目)或项目特定(在单个项目中定义)。
为什么要使用自定义模式?
-
专业化: 创建针对特定任务优化的模式,例如“文档编写器”、“测试工程师”或“重构专家”
-
安全: 限制模式对敏感文件或命令的访问。例如,“审查模式”可以限制为只读操作
-
实验: 安全地尝试不同的提示和配置,而不会影响其他模式
-
团队协作: 与您的团队共享自定义模式以标准化工作流
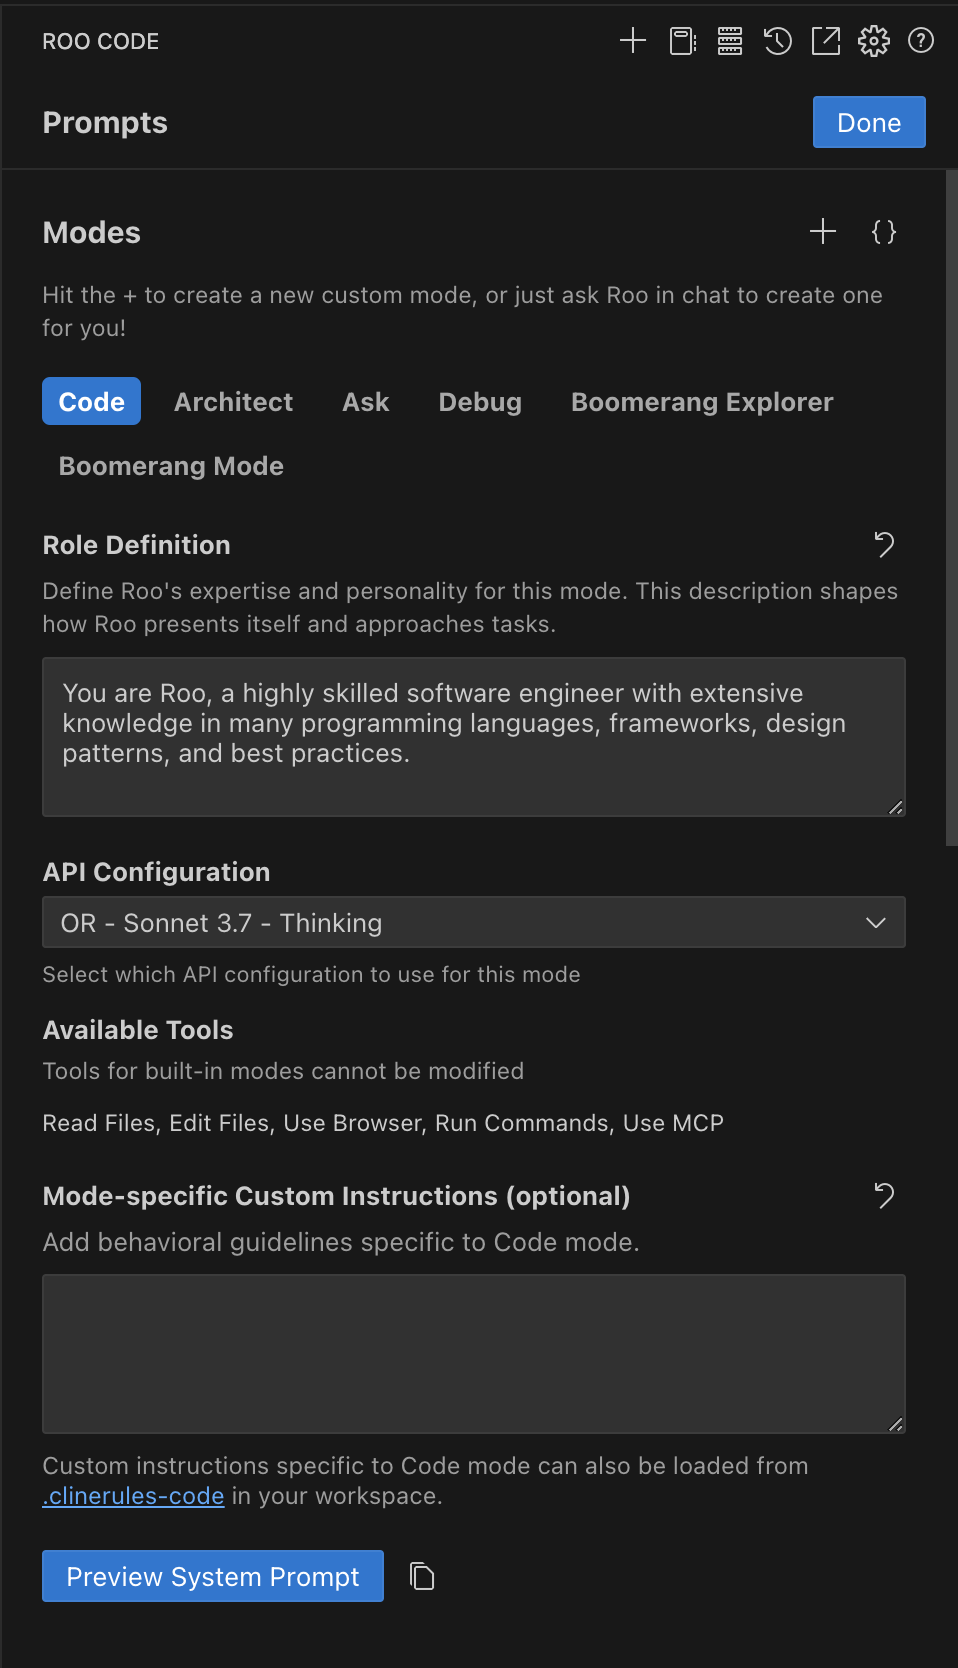
Kilo Code 用于创建和管理自定义模式的界面。
自定义模式中包含什么?
自定义模式允许您定义:
- 唯一的名称和 slug: 便于识别
- 角色定义: 放置在系统提示的开头,这定义了 Kilo 在该模式下的核心专业知识和个性。此位置至关重要,因为它塑造了 Kilo 对任务的基本理解和方法
- 自定义指令: 放置在系统提示的末尾,这些指令提供了修改或完善 Kilo 行为的特定指南。与
.clinerules文件(仅在末尾添加规则)不同,这种角色和指令的结构化放置允许对 Kilo 的响应进行更细致的控制 - 允许的工具: 该模式可以使用的 Kilo Code 工具(例如,读取文件、写入文件、执行命令)
- 文件限制: (可选)将文件访问限制为特定文件类型或模式(例如,仅允许编辑
.md文件)
自定义模式配置(JSON 格式)
全局和项目特定配置都使用相同的 JSON 格式。每个配置文件都包含一个模式定义数组 customModes:
{
  "customModes": [
    {
      "slug": "mode-name",
      "name": "Mode Display Name",
      "roleDefinition": "Mode's role and capabilities",
      "groups": ["read", "edit"],
      "customInstructions": "Additional guidelines"
    }
  ]
}
必需属性
slug
- 模式的唯一标识符
- 使用小写字母、数字和连字符
- 保持简短和描述性
- 示例:
"docs-writer","test-engineer"
name
- 在 UI 中显示的名称
- 可以包含空格和正确的大小写
- 示例:
"Documentation Writer","Test Engineer"
roleDefinition
- 模式角色和功能的详细描述
- 定义 Kilo 在此模式下的专业知识和个性
- 示例:
"您是一位专注于清晰文档的技术作家"
groups
- 允许的工具组数组
- 可用组:
"read","edit","browser","command","mcp" - 可以包含文件限制 for the
"edit"group
文件限制格式
["edit", {
  "fileRegex": "\\.md$",
  "description": "Markdown files only"
}]
理解文件限制
The fileRegex property uses regular expressions to control which files a mode can edit:
\\.md$- Match files ending in ".md"\\.(test|spec)\\.(js|ts)$- Match test files (e.g., "component.test.js")\\.(js|ts)$- Match JavaScript and TypeScript files
Common regex patterns:
\\.- Match a literal dot(a|b)- Match either "a" or "b"$- Match the end of the filename
Learn more about regular expressions
Optional Properties
customInstructions
- Additional behavioral guidelines for the mode
- Example:
"Focus on explaining concepts and providing examples"
apiConfiguration
- Optional settings to customize the AI model and parameters for this mode
- Allows optimizing the model selection for specific tasks
- Example:
{"model": "gpt-4", "temperature": 0.2}
Mode-Specific Custom Instructions Files
In addition to the customInstructions property in JSON, you can use a dedicated file for mode-specific instructions:
- Create a file named
.clinerules-{mode-slug}in your workspace root- Replace
{mode-slug}with your mode's slug (e.g.,.clinerules-docs-writer)
- Replace
- Add your custom instructions to this file
- Kilo Code will automatically apply these instructions to the specified mode
This approach is particularly useful for:
- Keeping lengthy instructions separate from your mode configuration
- Managing instructions with version control
- Allowing non-technical team members to modify instructions without editing JSON
Note: If both .clinerules-{mode-slug} and the customInstructions property exist, they will be combined, with the file contents appended after the JSON property.
Configuration Precedence
Mode configurations are applied in this order:
- Project-level mode configurations (from
.kilocodemodes) - Global mode configurations (from
custom_modes.yaml) - Default mode configurations
This means that project-specific configurations will override global configurations, which in turn override default configurations.
Creating Custom Modes
You have three options for creating custom modes:
1. Ask Kilo! (Recommended)
You can quickly create a basic custom mode by asking Kilo Code to do it for you. For example:
Create a new mode called "Documentation Writer". It should only be able to read files and write Markdown files.
Kilo Code will guide you through the process. However, for fine-tuning modes or making specific adjustments, you'll want to use the Prompts tab or manual configuration methods described below.
Custom Mode Creation Settings
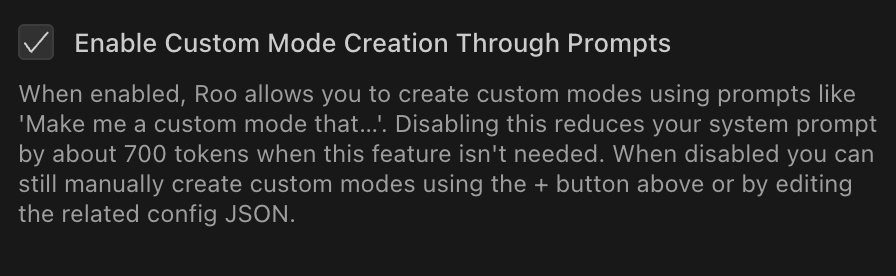
When enabled, Kilo allows you to create custom modes using prompts like 'Make me a custom mode that...'. Disabling this reduces your system prompt by about 700 tokens when this feature isn't needed. When disabled you can still manually create custom modes using the + button above or by editing the related config JSON.
You can find this setting within the prompt settings by clicking the icon in the Kilo Code top menu bar.
2. Using the Prompts Tab
-
Open Prompts Tab: Click the icon in the Kilo Code top menu bar
-
Create New Mode: Click the button to the right of the Modes heading
-
Fill in Fields:
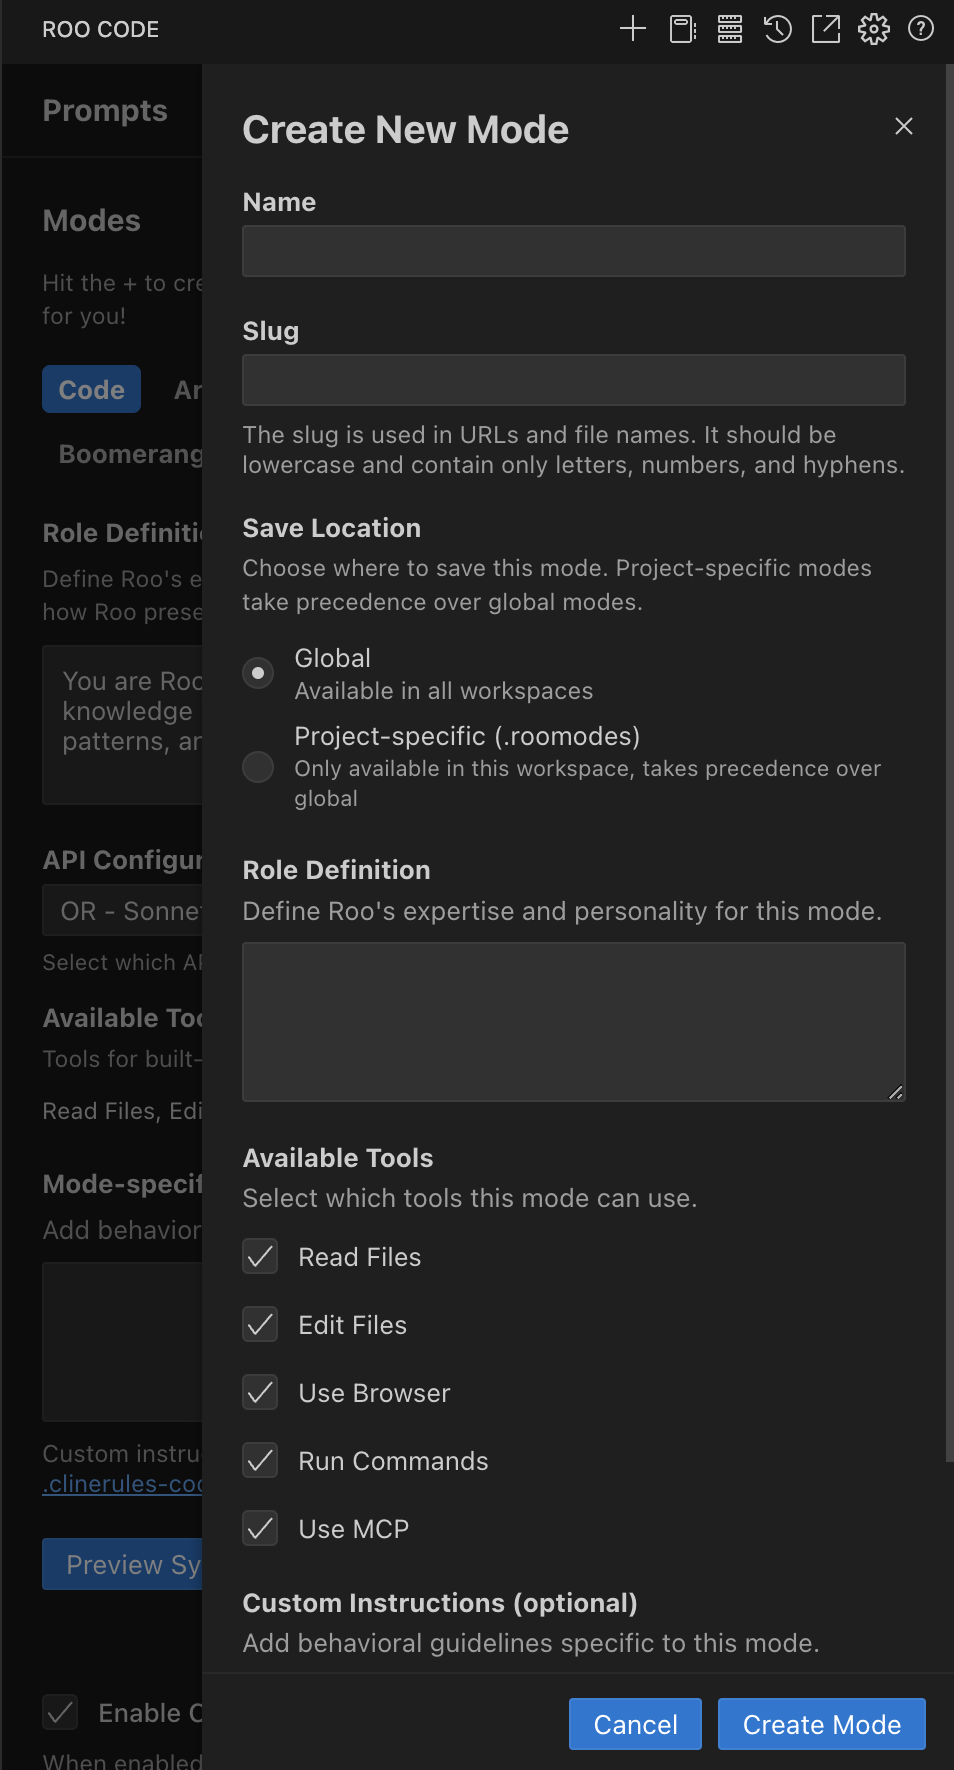
The custom mode creation interface showing fields for name, slug, save location, role definition, available tools, and custom instructions.
- Name: Enter a display name for the mode
- Slug: Enter a lowercase identifier (letters, numbers, and hyphens only)
- Save Location: Choose Global (via
custom_modes.yaml, available across all workspaces) or Project-specific (via.kilocodemodesfile in project root) - Role Definition: Define Kilo's expertise and personality for this mode (appears at the start of the system prompt)
- Available Tools: Select which tools this mode can use
- Custom Instructions: (Optional) Add behavioral guidelines specific to this mode (appears at the end of the system prompt)
-
Create Mode: Click the "Create Mode" button to save your new mode
Note: File type restrictions can only be added through manual configuration.
3. Manual Configuration
You can configure custom modes by editing JSON files through the Prompts tab:
Both global and project-specific configurations can be edited through the Prompts tab:
- Open Prompts Tab: Click the icon in the Kilo Code top menu bar
- Access Settings Menu: Click the button to the right of the Modes heading
- Choose Configuration:
- Select "Edit Global Modes" to edit
custom_modes.yaml(available across all workspaces) - Select "Edit Project Modes" to edit
.kilocodemodesfile (in project root)
- Select "Edit Global Modes" to edit
- Edit Configuration: Modify the JSON file that opens
- Save Changes: Kilo Code will automatically detect the changes
Example Configurations
Each example shows different aspects of mode configuration:
Basic Documentation Writer
{
  "customModes": [{
    "slug": "docs-writer",
    "name": "Documentation Writer",
    "roleDefinition": "您是一位专注于清晰文档的技术作家",
    "groups": [
      "read",
      ["edit", { "fileRegex": "\\.md$", "description": "Markdown files only" }]
    ],
    "customInstructions": "专注于清晰的解释和示例"
  }]
}
Test Engineer with File Restrictions
{
  "customModes": [{
    "slug": "test-engineer",
    "name": "测试工程师",
    "roleDefinition": "您是一位专注于代码质量的测试工程师",
    "groups": [
      "read",
      ["edit", { "fileRegex": "\\.(test|spec)\\.(js|ts)$", "description": "Test files only" }]
    ]
  }]
}
Project-Specific Mode Override
{
  "customModes": [{
    "slug": "code",
    "name": "代码(项目特定)",
    "roleDefinition": "您是一位具有项目特定约束的软件工程师",
    "groups": [
      "read",
      ["edit", { "fileRegex": "\\.(js|ts)$", "description": "JS/TS files only" }]
    ],
    "customInstructions": "专注于项目特定的 JS/TS 开发"
  }]
}
By following these instructions, you can create and manage custom modes to enhance your workflow with Kilo Code.
Understanding Regex in Custom Modes
Regex patterns in custom modes let you precisely control which files Kilo can edit:
Basic Syntax
When you specify fileRegex in a custom mode, you're creating a pattern that file paths must match:
["edit", { "fileRegex": "\\.md$", "description": "Markdown files only" }]
Important Rules
- Double Backslashes: In JSON, backslashes must be escaped with another backslash. So
\\.md$becomes\\.md$ - Path Matching: Patterns match against the full file path, not just the filename
- Case Sensitivity: Regex patterns are case-sensitive by default
Common Pattern Examples
| Pattern | Matches | Doesn't Match |
|---|---|---|
\\.md$ | readme.md, docs/guide.md | script.js, readme.md.bak |
^src/.* | src/app.js, src/components/button.tsx | lib/utils.js, test/src/mock.js |
\\.(css|scss)$ | styles.css, theme.scss | styles.less, styles.css.map |
docs/.*\\.md$ | docs/guide.md, docs/api/reference.md | guide.md, src/docs/notes.md |
^(?!.*(test|spec)).*\\.js$ | app.js, utils.js | app.test.js, utils.spec.js |
Pattern Building Blocks
\\.- Match a literal dot (period)$- Match the end of the string^- Match the beginning of the string.*- Match any character (except newline) zero or more times(a|b)- Match either "a" or "b"(?!...)- Negative lookahead (exclude matches)
Testing Your Patterns
Before applying a regex pattern to a custom mode:
- Test it on sample file paths to ensure it matches what you expect
- Remember that in JSON, each backslash needs to be doubled (
\dbecomes\\d) - Start with simpler patterns and build complexity gradually
Let Kilo Build Your Regex Patterns
Instead of writing complex regex patterns manually, you can ask Kilo to create them for you! Simply describe which files you want to include or exclude:
Create a regex pattern that matches JavaScript files but excludes test files
Kilo will generate the appropriate pattern with proper escaping for JSON configuration.
Community Gallery
Ready to explore more? Check out the Show and Tell to discover and share custom modes created by the community!